Apprendre php tutoriel 3
PHP - GET & POST Methods
There are two ways the browser client can send information to the web server.
- The GET Method
- The POST Method
Before the browser sends the information, it encodes it using a scheme called URL encoding. In this scheme, name/value pairs are joined with equal signs and different pairs are separated by the ampersand.
name1=value1&name2=value2&name3=value3
Spaces are removed and replaced with the + character and any other nonalphanumeric characters are replaced with a hexadecimal values. After the information is encoded it is sent to the server.
The GET Method
The GET method sends the encoded user information appended to the page request. The page and the encoded information are separated by the ?character.
http://www.test.com/index.htm?name1=value1&name2=value2
- The GET method produces a long string that appears in your server logs, in the browser's Location: box.
- The GET method is restricted to send upto 1024 characters only.
- Never use GET method if you have password or other sensitive information to be sent to the server.
- GET can't be used to send binary data, like images or word documents, to the server.
- The data sent by GET method can be accessed using QUERY_STRING environment variable.
- The PHP provides $_GET associative array to access all the sent information using GET method.
Try out following example by putting the source code in test.php script.
<?phpif( $_GET["name"] || $_GET["age"] ) {echo "Welcome ". $_GET['name']. "<br />";echo "You are ". $_GET['age']. " years old.";exit();}?><html><body><form action = "<?php $_PHP_SELF ?>" method = "GET">Name: <input type = "text" name = "name" />Age: <input type = "text" name = "age" /><input type = "submit" /></form></body></html>
It will produce the following result −

The POST Method
The POST method transfers information via HTTP headers. The information is encoded as described in case of GET method and put into a header called QUERY_STRING.
- The POST method does not have any restriction on data size to be sent.
- The POST method can be used to send ASCII as well as binary data.
- The data sent by POST method goes through HTTP header so security depends on HTTP protocol. By using Secure HTTP you can make sure that your information is secure.
- The PHP provides $_POST associative array to access all the sent information using POST method.
Try out following example by putting the source code in test.php script.
<?phpif( $_POST["name"] || $_POST["age"] ) {if (preg_match("/[^A-Za-z'-]/",$_POST['name'] )) {die ("invalid name and name should be alpha");}echo "Welcome ". $_POST['name']. "<br />";echo "You are ". $_POST['age']. " years old.";exit();}?><html><body><form action = "<?php $_PHP_SELF ?>" method = "POST">Name: <input type = "text" name = "name" />Age: <input type = "text" name = "age" /><input type = "submit" /></form></body></html>
It will produce the following result −
The $_REQUEST variable
The PHP $_REQUEST variable contains the contents of both $_GET, $_POST, and $_COOKIE. We will discuss $_COOKIE variable when we will explain about cookies.
The PHP $_REQUEST variable can be used to get the result from form data sent with both the GET and POST methods.
Try out following example by putting the source code in test.php script.
<?phpif( $_REQUEST["name"] || $_REQUEST["age"] ) {echo "Welcome ". $_REQUEST['name']. "<br />";echo "You are ". $_REQUEST['age']. " years old.";exit();}?><html><body><form action = "<?php $_PHP_SELF ?>" method = "POST">Name: <input type = "text" name = "name" />Age: <input type = "text" name = "age" /><input type = "submit" /></form></body></html>
Here $_PHP_SELF variable contains the name of self script in which it is being called.
It will produce the following result −
PHP - File Inclusion
You can include the content of a PHP file into another PHP file before the server executes it. There are two PHP functions which can be used to included one PHP file into another PHP file.
- The include() Function
- The require() Function
This is a strong point of PHP which helps in creating functions, headers, footers, or elements that can be reused on multiple pages. This will help developers to make it easy to change the layout of complete website with minimal effort. If there is any change required then instead of changing thousand of files just change included file.
The include() Function
The include() function takes all the text in a specified file and copies it into the file that uses the include function. If there is any problem in loading a file then the include() function generates a warning but the script will continue execution.
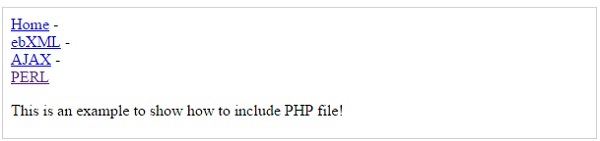
Assume you want to create a common menu for your website. Then create a file menu.php with the following content.
<a href="http://www.tutorialspoint.com/index.htm">Home</a> -<a href="http://www.tutorialspoint.com/ebxml">ebXML</a> -<a href="http://www.tutorialspoint.com/ajax">AJAX</a> -<a href="http://www.tutorialspoint.com/perl">PERL</a> <br />
Now create as many pages as you like and include this file to create header. For example now your test.php file can have following content.
<html><body><?php include("menu.php"); ?><p>This is an example to show how to include PHP file!</p></body></html>
It will produce the following result −
The require() Function
The require() function takes all the text in a specified file and copies it into the file that uses the include function. If there is any problem in loading a file then the require() function generates a fatal error and halt the execution of the script.
So there is no difference in require() and include() except they handle error conditions. It is recommended to use the require() function instead of include(), because scripts should not continue executing if files are missing or misnamed.
You can try using above example with require() function and it will generate same result. But if you will try following two examples where file does not exist then you will get different results.
<html><body><?php include("xxmenu.php"); ?><p>This is an example to show how to include wrong PHP file!</p></body></html>
This will produce the following result −
This is an example to show how to include wrong PHP file!
Now lets try same example with require() function.
<html><body><?php require("xxmenu.php"); ?><p>This is an example to show how to include wrong PHP file!</p></body></html>
This time file execution halts and nothing is displayed.
NOTE − You may get plain warning messages or fatal error messages or nothing at all. This depends on your PHP Server configuration.
PHP - Files & I/O
This chapter will explain following functions related to files −
- Opening a file
- Reading a file
- Writing a file
- Closing a file
Opening and Closing Files
The PHP fopen() function is used to open a file. It requires two arguments stating first the file name and then mode in which to operate.
Files modes can be specified as one of the six options in this table.
| Sr.No | Mode & Purpose |
|---|---|
| 1 |
r
Opens the file for reading only.
Places the file pointer at the beginning of the file.
|
| 2 |
r+
Opens the file for reading and writing.
Places the file pointer at the beginning of the file.
|
| 3 |
w
Opens the file for writing only.
Places the file pointer at the beginning of the file.
and truncates the file to zero length. If files does not
exist then it attempts to create a file.
|
| 4 |
w+
Opens the file for reading and writing only.
Places the file pointer at the beginning of the file.
and truncates the file to zero length. If files does not
exist then it attempts to create a file.
|
| 5 |
a
Opens the file for writing only.
Places the file pointer at the end of the file.
If files does not exist then it attempts to create a file.
|
| 6 |
a+
Opens the file for reading and writing only.
Places the file pointer at the end of the file.
If files does not exist then it attempts to create a file.
|
If an attempt to open a file fails then fopen returns a value of false otherwise it returns a file pointer which is used for further reading or writing to that file.
After making a changes to the opened file it is important to close it with the fclose() function. The fclose() function requires a file pointer as its argument and then returns true when the closure succeeds or false if it fails.
Reading a file
Once a file is opened using fopen() function it can be read with a function called fread(). This function requires two arguments. These must be the file pointer and the length of the file expressed in bytes.
The files length can be found using the filesize() function which takes the file name as its argument and returns the size of the file expressed in bytes.
So here are the steps required to read a file with PHP.
- Open a file using fopen() function.
- Get the file's length using filesize() function.
- Read the file's content using fread() function.
- Close the file with fclose() function.
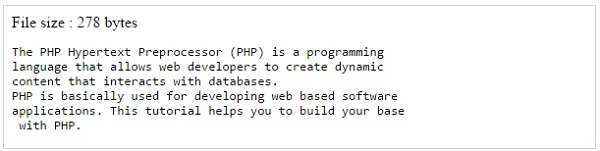
The following example assigns the content of a text file to a variable then displays those contents on the web page.
<html><head><title>Reading a file using PHP</title></head><body><?php$filename = "tmp.txt";$file = fopen( $filename, "r" );if( $file == false ) {echo ( "Error in opening file" );exit();}$filesize = filesize( $filename );$filetext = fread( $file, $filesize );fclose( $file );echo ( "File size : $filesize bytes" );echo ( "<pre>$filetext</pre>" );?></body></html>
It will produce the following result −
Writing a file
A new file can be written or text can be appended to an existing file using the PHP fwrite() function. This function requires two arguments specifying a file pointer and the string of data that is to be written. Optionally a third integer argument can be included to specify the length of the data to write. If the third argument is included, writing would will stop after the specified length has been reached.
The following example creates a new text file then writes a short text heading inside it. After closing this file its existence is confirmed using file_exist()function which takes file name as an argument
<?php$filename = "/home/user/guest/newfile.txt";$file = fopen( $filename, "w" );if( $file == false ) {echo ( "Error in opening new file" );exit();}fwrite( $file, "This is a simple test\n" );fclose( $file );?><html><head><title>Writing a file using PHP</title></head><body><?php$filename = "newfile.txt";$file = fopen( $filename, "r" );if( $file == false ) {echo ( "Error in opening file" );exit();}$filesize = filesize( $filename );$filetext = fread( $file, $filesize );fclose( $file );echo ( "File size : $filesize bytes" );echo ( "$filetext" );echo("file name: $filename");?></body></html>
It will produce the following result −

We have covered all the function related to file input and out in PHP File System Function chapter.
PHP - Functions
PHP functions are similar to other programming languages. A function is a piece of code which takes one more input in the form of parameter and does some processing and returns a value.
You already have seen many functions like fopen() and fread() etc. They are built-in functions but PHP gives you option to create your own functions as well.
There are two parts which should be clear to you −
- Creating a PHP Function
- Calling a PHP Function
In fact you hardly need to create your own PHP function because there are already more than 1000 of built-in library functions created for different area and you just need to call them according to your requirement.
Please refer to PHP Function Reference for a complete set of useful functions.
Creating PHP Function
Its very easy to create your own PHP function. Suppose you want to create a PHP function which will simply write a simple message on your browser when you will call it. Following example creates a function called writeMessage() and then calls it just after creating it.
Note that while creating a function its name should start with keyword function and all the PHP code should be put inside { and } braces as shown in the following example below −
<html><head><title>Writing PHP Function</title></head><body><?php/* Defining a PHP Function */function writeMessage() {echo "You are really a nice person, Have a nice time!";}/* Calling a PHP Function */writeMessage();?></body></html>
This will display following result −
You are really a nice person, Have a nice time!
PHP Functions with Parameters
PHP gives you option to pass your parameters inside a function. You can pass as many as parameters your like. These parameters work like variables inside your function. Following example takes two integer parameters and add them together and then print them.
<html><head><title>Writing PHP Function with Parameters</title></head><body><?phpfunction addFunction($num1, $num2) {$sum = $num1 + $num2;echo "Sum of the two numbers is : $sum";}addFunction(10, 20);?></body></html>
This will display following result −
Sum of the two numbers is : 30
Passing Arguments by Reference
It is possible to pass arguments to functions by reference. This means that a reference to the variable is manipulated by the function rather than a copy of the variable's value.
Any changes made to an argument in these cases will change the value of the original variable. You can pass an argument by reference by adding an ampersand to the variable name in either the function call or the function definition.
Following example depicts both the cases.
<html><head><title>Passing Argument by Reference</title></head><body><?phpfunction addFive($num) {$num += 5;}function addSix(&$num) {$num += 6;}$orignum = 10;addFive( $orignum );echo "Original Value is $orignum<br />";addSix( $orignum );echo "Original Value is $orignum<br />";?></body></html>
This will display following result −
Original Value is 10Original Value is 16
PHP Functions returning value
A function can return a value using the return statement in conjunction with a value or object. return stops the execution of the function and sends the value back to the calling code.
You can return more than one value from a function using return array(1,2,3,4).
Following example takes two integer parameters and add them together and then returns their sum to the calling program. Note that return keyword is used to return a value from a function.
<html><head><title>Writing PHP Function which returns value</title></head><body><?phpfunction addFunction($num1, $num2) {$sum = $num1 + $num2;return $sum;}$return_value = addFunction(10, 20);echo "Returned value from the function : $return_value";?></body></html>
This will display following result −
Returned value from the function : 30
Setting Default Values for Function Parameters
You can set a parameter to have a default value if the function's caller doesn't pass it.
Following function prints NULL in case use does not pass any value to this function.
<html><head><title>Writing PHP Function which returns value</title></head><body><?phpfunction printMe($param = NULL) {print $param;}printMe("This is test");printMe();?></body></html>
This will produce following result −
This is test
Dynamic Function Calls
It is possible to assign function names as strings to variables and then treat these variables exactly as you would the function name itself. Following example depicts this behaviour.
<html><head><title>Dynamic Function Calls</title></head><body><?phpfunction sayHello() {echo "Hello<br />";}$function_holder = "sayHello";$function_holder();?></body></html>
This will display following result −
PHP - Cookies
Cookies are text files stored on the client computer and they are kept of use tracking purpose. PHP transparently supports HTTP cookies.
There are three steps involved in identifying returning users −
- Server script sends a set of cookies to the browser. For example name, age, or identification number etc.
- Browser stores this information on local machine for future use.
- When next time browser sends any request to web server then it sends those cookies information to the server and server uses that information to identify the user.
This chapter will teach you how to set cookies, how to access them and how to delete them.
The Anatomy of a Cookie
Cookies are usually set in an HTTP header (although JavaScript can also set a cookie directly on a browser). A PHP script that sets a cookie might send headers that look something like this −
HTTP/1.1 200 OK
Date: Fri, 04 Feb 2000 21:03:38 GMT
Server: Apache/1.3.9 (UNIX) PHP/4.0b3
Set-Cookie: name=xyz; expires=Friday, 04-Feb-07 22:03:38 GMT;
                 path=/; domain=tutorialspoint.com
Connection: close
Content-Type: text/html
As you can see, the Set-Cookie header contains a name value pair, a GMT date, a path and a domain. The name and value will be URL encoded. The expires field is an instruction to the browser to "forget" the cookie after the given time and date.
If the browser is configured to store cookies, it will then keep this information until the expiry date. If the user points the browser at any page that matches the path and domain of the cookie, it will resend the cookie to the server.The browser's headers might look something like this −
GET / HTTP/1.0
Connection: Keep-Alive
User-Agent: Mozilla/4.6 (X11; I; Linux 2.2.6-15apmac ppc)
Host: zink.demon.co.uk:1126
Accept: image/gif, */*
Accept-Encoding: gzip
Accept-Language: en
Accept-Charset: iso-8859-1,*,utf-8
Cookie: name=xyz
A PHP script will then have access to the cookie in the environmental variables $_COOKIE or $HTTP_COOKIE_VARS[] which holds all cookie names and values. Above cookie can be accessed using $HTTP_COOKIE_VARS["name"].
Setting Cookies with PHP
PHP provided setcookie() function to set a cookie. This function requires upto six arguments and should be called before <html> tag. For each cookie this function has to be called separately.
setcookie(name, value, expire, path, domain, security);
Here is the detail of all the arguments −
- Name − This sets the name of the cookie and is stored in an environment variable called HTTP_COOKIE_VARS. This variable is used while accessing cookies.
- Value − This sets the value of the named variable and is the content that you actually want to store.
- Expiry − This specify a future time in seconds since 00:00:00 GMT on 1st Jan 1970. After this time cookie will become inaccessible. If this parameter is not set then cookie will automatically expire when the Web Browser is closed.
- Path − This specifies the directories for which the cookie is valid. A single forward slash character permits the cookie to be valid for all directories.
- Domain − This can be used to specify the domain name in very large domains and must contain at least two periods to be valid. All cookies are only valid for the host and domain which created them.
- Security − This can be set to 1 to specify that the cookie should only be sent by secure transmission using HTTPS otherwise set to 0 which mean cookie can be sent by regular HTTP.
Following example will create two cookies name and age these cookies will be expired after one hour.
<?php
   setcookie("name", "John Watkin", time()+3600, "/","", 0);
   setcookie("age", "36", time()+3600, "/", "",  0);
?>
<html>

   <head>
      <title>Setting Cookies with PHP</title>
   </head>

   <body>
      <?php echo "Set Cookies"?>
   </body>

</html>
Accessing Cookies with PHP
PHP provides many ways to access cookies. Simplest way is to use either $_COOKIE or $HTTP_COOKIE_VARS variables. Following example will access all the cookies set in above example.
<html>

   <head>
      <title>Accessing Cookies with PHP</title>
   </head>

   <body>

      <?php
         echo $_COOKIE["name"]. "<br />";

         /* is equivalent to */
         echo $HTTP_COOKIE_VARS["name"]. "<br />";

         echo $_COOKIE["age"] . "<br />";

         /* is equivalent to */
         echo $HTTP_COOKIE_VARS["age"] . "<br />";
      ?>

   </body>
</html>
You can use isset() function to check if a cookie is set or not.
<html>

   <head>
      <title>Accessing Cookies with PHP</title>
   </head>

   <body>

      <?php
         if( isset($_COOKIE["name"]))
            echo "Welcome " . $_COOKIE["name"] . "<br />";

         else
            echo "Sorry... Not recognized" . "<br />";
      ?>

   </body>
</html>
Deleting Cookie with PHP
Officially, to delete a cookie you should call setcookie() with the name argument only but this does not always work well, however, and should not be relied on.
It is safest to set the cookie with a date that has already expired −
<?php
   setcookie( "name", "", time()- 60, "/","", 0);
   setcookie( "age", "", time()- 60, "/","", 0);
?>
<html>

   <head>
      <title>Deleting Cookies with PHP</title>
   </head>

   <body>
      <?php echo "Deleted Cookies" ?>
   </body>
   </html>


تعليقات
إرسال تعليق